ADVENTURE HIKES AND CANYONEERING
IN THE SOUTHWEST
© Christopher Earls Brennen

|
|---|

|
Hike A8. Weavers Needle
- Hiking time: 10.7 hours
- Estimated hiking distance: 10 miles
- Elevation gain: 2150 feet
- USGS Topo Map: Weavers Needle
- Difficulties: Cross country hiking and navigation in the desert with no water available; technical rock climbing, a short, 15ft section with an estimated rating of 5.6 and much climbing rated 5.4 and lower
- Special equipment: Full rock climbing gear, harnesses, helmets, rappel devices (ATC or figure eight), one 60m rope, 30ft webbing, about six 4ft slings, six quickdraws, two small nuts and assorted carabiniers; hats and sunscreen, headlamps and lots of water
-
ACA Rating: 4A IV

Characteristics
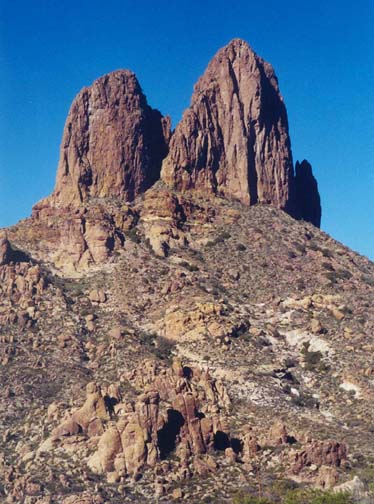
The wild and rugged Superstition Mountain Wilderness east of Phoenix, Arizona, will thrill any visitor with its landscape of legends, of sweeping desert mountains, of lost gold mines and of Apache Indian hideaways. The famous Apache Trail (still a rugged dirt road) runs from southwest to northeast through this wilderness and allows the vehicle-bound visitor to get some taste of this magnificient place. But to really appreciate its natural beauty, you have to leave those vehicles behind and take to the trail. This rock-climbing adventure takes you to the top of the symbolic peak of the Superstition Wilderness, the awesome Weavers Needle. Situated in the middle of the Superstitions, Weavers Needle is a thousand foot high column of rock that rises majestically from the desert floor and dominates the land for thirty miles around. A weathered volcanic plug with a summit elevation of 4553ft, Weavers Needle is set in a desert landscape of cactus and mesquite bush, with towering Saguaro cacti particularly prominent.
The Superstitions are rife with legends of gold and greed, among the more famous being the tale of the Lost Dutchman Mine. Reputedly discovered by Don Miguel Peralta in 1842, its location was lost when Peralta and his men were murdered by the Apaches. One of the miners did survive to inform the "Dutchman", Jacob Waltz, of its fabulous wealth and its location but Waltz took that information to his grave in 1891. Since then hundreds have searched in vain for those riches and many have died in the effort. It is said that the shadow of Weavers Needle reveals the location on a particular time and date.
It is a tough, all-day adventure to get to the top of Weavers Needle and get back out before dark. Since the hike is most comfortably undertaken in the winter when the days are cool but short it is important to be on the trail as soon as it is light. When we did it in late December, we ended up hiking the last few miles back to the trailhead in the dark.
The adventure divides naturally into three parts. The first section is a four mile trail walk; the second (and in some ways most challenging) is a cross-country hike to the base of the rockface; and the third is the technical rock climb up the column itself. But the rewards are a spectacular view in all directions. And if, like us, you are very, very lucky two great golden eagles will circle right above your head, soaring on the morning thermal rising up the side of the peak. And you will stand in awe of the seven foot wing span of the female and recognize that this moment is worth all the gold that might be found in the Lost Dutchmans Mine.
Trailhead
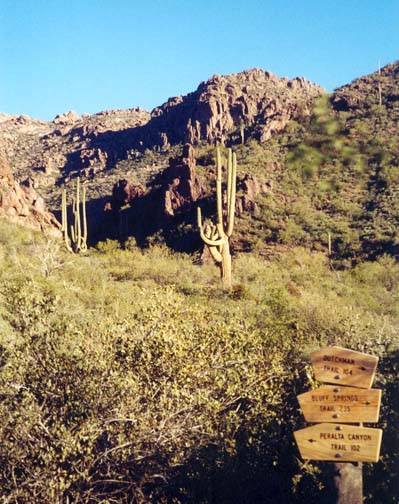
The hike begins at the popular Peralta Trailhead (33o23.85'N 111o20.89'W) at the entrance to Peralta Canyon on the southern boundary of the Superstition Mountains. Drive about 30mi east from Phoenix, Arizona, on Highway 60 toward Globe. About 4.5mi beyond the end of the freeway at milepost 204, you turn left following the signs for the Peralta Trailhead. After about 5.5mi of good dirt road you will come to fork where you follow the Peralta Trailhead sign and fork left. (Near here a pack of about six coyotes casually crossed the road ahead of us on their morning hunt.) Continuing another 0.6mi, you fork right and drive another 0.9mi to the well-developed trailhead with restrooms and a machine that dispenses parking permits. They cost $4.00, but you can even pay by credit card!
Hike
Several trails emanate from the Peralta Trailhead (33o23.85'N 111o20.89'W) and two of these will access Weavers Needle. The Peralta Canyon Trail (#102) proceeds up the left side of Peralta Canyon to its head at Fremont Saddle (3766ft) and can be used to access the western side of Weavers Needle. We chose the alternate route and headed up the Bluff Springs trail (#235, labelled incorrectly as the Dutchmans Trail on the topo map) on the right side of Peralta Canyon. Very quickly you arrive at a trail junction where the Dutchmans Trail (#104) forks off to the right. Taking the left fork or Bluff Springs Trail we quickly climbed out of Peralta Canyon and briefly ascended the ridge separating it from Barks Canyon to the east. At 33o24.27'N 111o20.79'W and elevation 2950ft an unmarked use-trail forks off to the left and continues up the ridge to Geronimo's Cave. However the main trail contours right into Barks Canyon and follows that to a marked trail junction at 33o25.36'N 111o21.02'W and elevation 3000ft (2.1mi and 1hr 15min from the start) where you leave the Bluff Springs Trail and fork left onto the less well-developed Terrapin Trail (#234). The Terrapin climbs over a series of small, false saddles eventually reaching the 3420ft Bluff Saddle 2.8mi from the start. Bluff Saddle (33o25.60'N 111o21.51'W) occurs just after a flat and sandy section of trail and is rather inconspicuous except that the trail now starts downward. Below the saddle the trail turns left and within a few hundred yards crosses from the right to the left side of a small streambed. Stop at this point and you will see Weaver's Needle to your northwest on the other side of a small ridge immediately in front of you. Leave the trail at this point (33o25.70'N 111o21.59'W) and climb toward a low saddle (33o25.72'N 111o21.70'W) just above you to the left of a block of rocks on the ridgeline. On the way up the shallow wash to this low saddle you should pick up a ducked trail. There is also a metal stake at the saddle itself to mark the way.
 | 
| |
|---|---|---|
| Peralta Canyon from trailhead | Weavers Needle from the low saddle |
You should reach the 3480ft low saddle a little less than 2hrs after leaving the trailhead. Stop here and take time to absorb the route ahead of you. From this vantage point Weavers Needle is a spectacular structure and you should readily discern the notch that separates the main monolith from the smaller spire to the south. Below the notch is the chute whose ascent will be the first technical part of the climb. Chances are it will be in dark shadow. The next substantial task is to cross the valley below and climb up the rugged and increasingly steep wash that leads directly up to the base of the chute. We actually ascended to that point by a different route further to the north and climbed a scree slope over to the left, accessed a prominent shelf that is readily visible and then walked along the shelf to the base of the chute. However, we descended by the more direct and more travelled route and concluded that this would also be preferable for the ascent. It proceeds as follows. You follow the ducked trail down from the low saddle to the flat sandy valley floor and head directly toward the wash leading straight up to the chute. On the valley floor you hike around the right side of a rocky prominence and follow the use trail as it proceeds up the wash deviating a little to the left to pass another rocky outcropping on the lowest slopes. Then you ascend a low ridge behind this second outcropping and gradually contour right into the main ascending wash where you proceed up the wash itself. Increasingly you must clamber up dryfalls and circumnavigate obstacles as you proceed straight toward the base of the chute. As you climb you will note some difficult dryfalls near the top of the wash. To bypass these you should contour over to the flat open slopes to the right of the wash and climb toward the base of a substantial cliff (the cliff below the aforementioned shelf) that represents the last major obstacle on the approach hike. This can be ascended by contouring back into the wash on your left that you left just a few minutes ago. If you are in the right wash, you will be able to clamber up to the shelf top using a convenient sloping rock ledge within the wash. If not, I recommend contouring left to the place where you can ascend the scree slope to the end of the shelf; then follow the shelf back left to the base of the chute. Either way, it will be clear when you reach the point at the base of the chute where the technical rock climb begins. You should reach this point (elevation 3970ft) about 3hr 10min from the start.
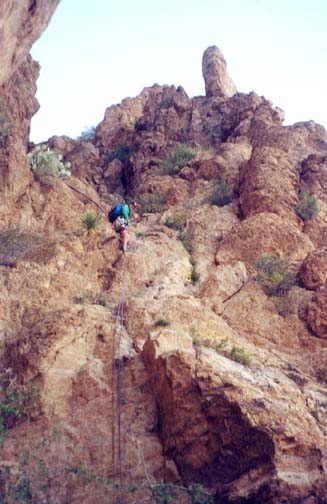
From this vantage point, the technical route up the chute looks quite formidable. In fact the first 30ft or so represent the most difficult section of the entire ascent and require the expertize of someone with good rock-climbing experience. A word of warning before you start. Between this point and the notch there is some danger from falling rocks if others are climbing above you. Rocks dislodged above tend to be funneled down into the chute from high overhead. Consequently helmets are highly recommended. Note, however, that the rock you will be climbing is generally excellent with many good hand and foot holds.
The climb begins about 30ft to the right of the middle of the chute where there is reddish composite rock with good hand and foot holds. The first place where a protective sling can be installed is a large rock about 30ft up just a few feet to the right of the middle of the chute. During this first 30ft, the lead climber can be incompletely protected by a belayer standing as high as possible in the middle of the chute. Beyond the first sling, there is another awkward move of about 10ft followed by an easier section leading to a set of anchor bolts in a hollow a little off to the right side. While these bolts could be used as the belay station at the top of the first pitch it is best for the lead climber to continue up, climbing easily to a rock prominence about 30ft higher. Setting up a belay station by slinging this rock, allows the notch to be reached at the top of the second pitch with a 60m rope. The climbing from the belay station to the notch is quite easy. When you reach the notch there are several large rocks (as well as a number of bolts and webbing complexes) that can be used as anchors. You should reach the notch (elevation 4230ft) just under 5hr from the start of the hike.
The view from the notch is spectacular. To the west you will see the Peralta trail and the approach up a wash to the western base of the notch. The climb up the western side of the notch is technically more difficult and requires the use of several cams to set up appropriate protection. The two routes converge at the notch.
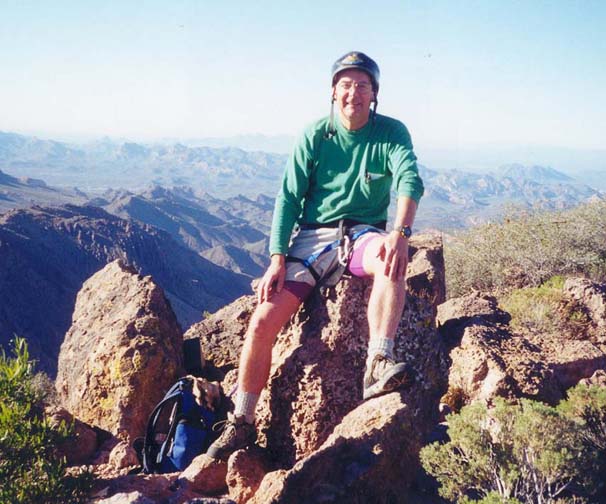
From the notch you climb up a self-evident 12ft step to the right (north); some good holds make this fairly easy and safe to do without a belay. Above the step the going is quite easy and you can climb about 300ft following the obvious use-trail that ascends the west side of the ridge of the main spire. This part does not require a belay on the ascent though we found it quicker and more comfortable to rappel the middle section on the way down. A prominent tree near the top has several webbing anchors to facilitate a belay for those who wish it. At this tree the trail veers left, passing between an outcropping and the main massif. This leads to a large flat shelf on the west side of the monolith at the bottom of the last 50ft technical section. Roping up here, the lead climber should ascend a small arete on the left, use a sling on a rock prominence at the top of the arete and then proceed further over to the left toward an obvious, small chute. There are marvellous hand and foot holds just to the right of the chute that allow you to climb easily to the top of this last technical section. At the top there is a convenient rock prominence that can be used to belay up the following climbers. From this point the top is just a short walk away. As you take these last steps note the two-bolt anchor, webbing and rappel rings off to your right that you will use for the first part of your descent. You should reach the summit (33o26.00'N 111o22.25'W and elevation 4553ft) a little over 6hr after leaving the trailhead.
 | 
| |
|---|---|---|
| On the summit of Weavers Needle | Rappelling down the chute |
The top of Weavers Needle is a short narrow ridge with a truly awesome view in all directions. The other outcroppings in the desert floor below you look tiny from this perspective and there is a marvellous toy-like quality to all the details that lie below you. As we enjoyed this unique view, a helicopter, barely visible, flew past far below us. To compensate for that intrusion I looked for the eagles but without success; it would be hard to see their silent flight against the background of the desert. Clancy and I shook hands and signed the register. Not much else needs to be said at moments and places like these.
The first part of the descent is about a 80ft rappel from the afore-mentioned anchor down to the platform at the base of the uppermost technical section. From there you might wish to rappel the part of the use-trail below the prominent tree but it is relatively easy to descend to the notch without any further use of the rope. The notch should be reached about 7hr from the start. From there a long rappel using a 60m rope and a webbing wrap on one of the large boulders will take you all the way down to the bolts in the chute noted on the way up. From those bolts it is a shorter rappel to the bottom of the chute. We ended this technical descent 7hr 40min after the morning start.
From the base of the chute you should take note again of the
cross-country route straight down wash below you to the valley floor
and then back up to the low saddle above the Terrapin trail. During
the descent it is wise to pause frequently to review this route since
things often look different as the perspective changes. We reached the
Terrapin Trail about 9hr after the start. Light was fading fast as
we passed over Bluff Saddle and forked right onto the Bluff Springs
Trail. We had to get out our headlamps for the last mile or so back
to the Peralta trailhead
(33o23.85'N 111o20.89'W), reaching there
10hr 45min after the morning start.
Christopher E. Brennen