ADVENTURE HIKES AND CANYONEERING
IN THE SOUTHWEST
© Christopher Earls Brennen
|
|---|

|
Hike G10. Monarch Canyon, Death Valley
- Hiking time: 4 hours
- Estimated hiking distance: 4.6 miles
- Elevation gain: 100 feet
- Topo Map: Chloride City
- Difficulties: One challenging 180ft rappel, some bushwhacking
- Special equipment: 200ft rope, 200ft recovery cord, 10ft webbing, one rappel ring, rapelling equipment, helmet
-
ACA Rating: 3A II

Characteristics
Death Valley National Park contains some of the most rugged and fantastic land in the world. That wonderland provides some marvellous adventures and canyoneering experiences. Though the heat in the summer is intolerable, the Park has the advantage that the mild winter weather allows outdoor activity when much of the rest of the southwest is too cold and wintery. While it does occasionally rain in the valleys and snow often covers the high peaks in the winter, at lower elevations the temperatures are perfect for exploring the many narrow, multicolored canyons that line both sides of the flat valley bottom. This collection of adventures contains several in Death Valley National Park. Though the hike to the summit of Telescope Peak is a summer outing, the other, canyoneering adventures included in this collection are best suited for the late fall, winter and early spring. If you plan to do much hiking in the Park, I strongly recommend you buy Michel Digonnet's excellent book "Hiking Death Valley".
Monarch Canyon is a good half-day adventure in the northern end of the Funeral Mountains on the east side of Death Valley. It is an interesting canyon with the remains of a gold mine and a narrow gorge that is overgrown with cane in places as a result of perennial springs. That narrow section ends in a dramatic drop-off that constitutes a challenging and beautiful 180ft rappel down a slot containing a small waterfall, the runoff from the springs. Other than the dropoff, the going is easy though bushwhacking through the cane forests provides several interludes of fun.
Trailhead
This half-day hike requires a short car shuttle. First drive to the Hell's Gate entrance station on highway 374, the road out of the Park to Beatty, Nevada. From the fork in the road at Hell's Gate, drive 0.7m south along the Beatty Cutoff (the road to Furnace Creek) and park one vehicle at the side of the road (36o42.86'N 116o58.50'W) in the middle of this flat, sloping alluvial plain. Before you leave this spot look over to the west at the prominent twin peaks of the Death Valley Buttes. The saddle between the twin peaks is quite distinctive and provides a readily recognized navigation aid for the last stage of the hike.
Then, in the other vehicle(s), drive back uphill to Hell's Gate and continue east for 3.4mi on highway 374 toward Beatty. Note the odometer reading carefully because the dirt turnoff from highway 374 is not prominently marked. The dirt road turn-off forks to the right and is currently only marked by a sign that reads "High Clearance, 4X4 recommended". Drive 2.3mi along this good dirt road to the readily recognized place where it crosses through Monarch Canyon (36o44.23'N 116o54.74'W). You can drive further down Monarch for a short way but it is better to leave your vehicle(s) here and enjoy the hike down the deepening canyon.
Hike
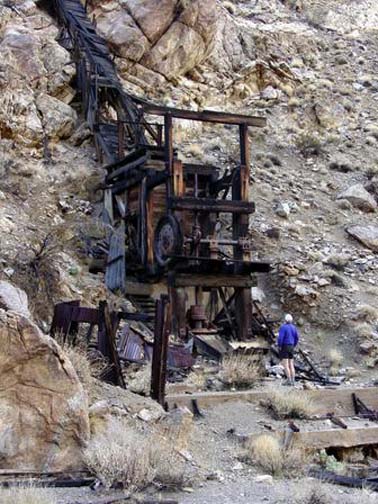
From the parking area (36o44.23'N 116o54.74'W and elevation 3520ft) hike down the dirt road that runs down into the canyon. The walls of the canyon rise quickly to an impressive height. Here as elsewhere in this canyon the rock and scrub have recently been scorched by fire, giving the land a stark and ominous appearance. About 0.7mi and 15min from the start a large side canyon enters on the left. As you approach this junction look up on the right canyon wall where there is an impressive hanging bowl that would be fun to access by rappelling down from the rim. At this canyon junction the streambed quite surprisingly drops a dramatic and vertical 150ft; however an old mine road bypasses this obstacle on the left and takes you down to the flat gravel bottom downstream of the dropoff. From there it is an easy 0.3mi hike down to the remains of the Indian Mine (36o43.48'N 116o55.12'W and elevation 2900ft) which you should reach about 25min from the start.
 | 
| |
|---|---|---|
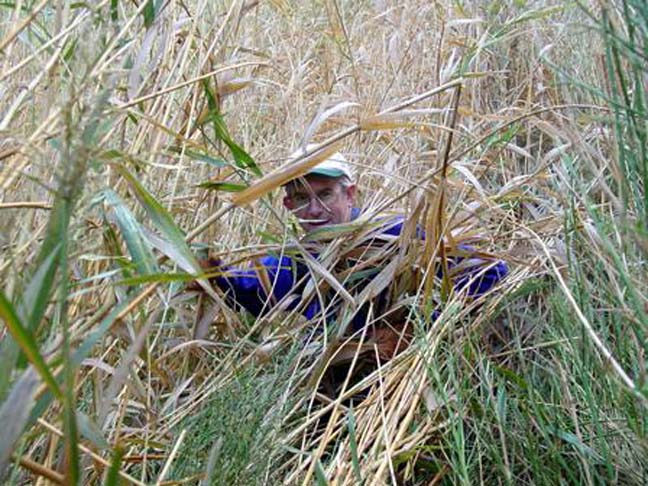
| Indian Mine stamp mill | Pushing through the cane | |
(Photos by Mark Duttweiler) | ||
This small gold mine, known as Indian Mine, was worked off and on for about five years between 1905 and 1910 though only one shipment of ore ever left the canyon. The mine shafts are high on the left wall of the canyon and the ore was dumped down a wooden chute taking it to a two-stamp mill on the canyon floor. The ruins of the chute and the mill still remain and are interesting to examine. Further downstream are more mining remnants including a mine shaft in the left wall at the location of the first spring. As you leave the stamp mill and continue downstream, the canyon closes in and the next half mile of narrow gorge is a highlight of the day. The going is easy for 200yds downstream of the stamp mill until you come to that first spring (elevation 2940ft) where the perennial water has caused a profusion of cane to grow and completely block the canyon bottom for about 100yds. You can avoid the first section of thick cane brush by climbing up and over the low shoulder on the right but you then have to climb down and force your way through the cane for about 50yds. It is easiest to try and follow the path beaten down by previous hikers. Fortunately the cane is relatively benign and you can get a reasonably good footing by standing on clumps of bent cane. Once through the intial thicket you can find a relatively clear path around the patches of cane and bullrush. The spring water forms a small stream that flows down the canyon all the way to the rappel.
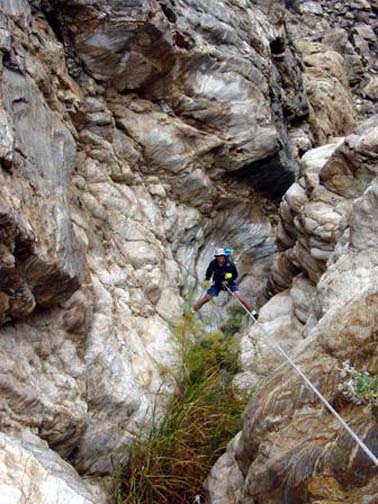
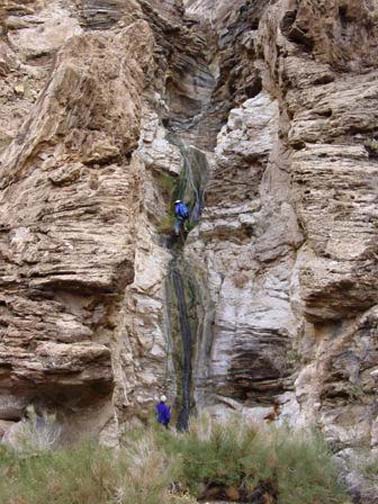
The narrow gorge ends abruptly at 36o43.16'N 116o55.65'W and an elevation of 2700ft, 1.7mi and 1hr 20min from the start. The bottom drops out of the canyon; all you can see is the stream dropping about 25ft into a narrow slot and then disappearing around a corner where it clearly drops much further. You have come to the only technical challenge in Monarch Canyon and you should now don your harness and helmet and prepare for an exciting rappel descent. Though it is possible to make a dry rappel descent from the rock high up on the right, I recommend the streambed descent which is both more exciting and prettier. It is, however, a long 180ft rappel with an awkward rope retrieval because of the corner. The anchor is a chockstone just below the level of the flat rock to the right of the slot. It is probably best to carry most of the rappel rope and the recovery line in bags since it is too far to throw them round the corner. The rappel has an awkward entry because of a sharp lip just a short distance below the anchor; the rock below the lip is severely undercut and therefore the 25ft rappel from there to the bottom of the slot is mostly free. The next stage is to walk along the water-filled bottom of the slot to the place where the slot turns to the right and plummets. From there it is a 110ft drop down the moss-covered waterfall to the large open area downstream of the drop-off. It is a spectacular and interesting rappel. You should be ready to continue down canyon about 2hrs 50min after the start.
 | 
| |
|---|---|---|
| Upper section of the rappel | Lower section of the rappel | |
(Photos by Mark Duttweiler) | ||
The wide bowl downstream of the rappel leads to a broad canyon
with massive great burnt cliffs that gradually lower themselves and spread
out. Though there is an short downclimb just
beyond the bowl, the rest of the hike is easy going over mostly flat gravel
beds. About 30min from the rappel and 2.7mi from the start of
the hike you come to the mouth of Monarch Canyon
(36o42.95'N 116o56.50'W and
elevation 2200ft).
Just before that a large side-canyon enters on the left; reputedly
there are some attractive dryfalls just a short way up that side-canyon.
At the mouth you look out at miles and miles of flat alluvial plain
stretching out into the distance. Though your recovery vehicle is visible
in the middle of that vista it is so far away that it might be difficult
to spot. You may first spot the occasional moving vehicle on the Beatty
Cutoff that crosses the alluvial plain. In the distance and beyond the
road you will recognize the twin peaks of the prominent Death
Valley Buttes due west of the mouth. Head straight for the saddle
between the peaks and follow this beacon for two miles across the
plain to reach the recovery vehicle
(36o42.86'N 116o58.50'W and
elevation 1990ft). The
total length of the hike is about 4.6mi and it should take about
4hrs.
Last updated 11/20/03.
Christopher E. Brennen