ADVENTURE HIKES AND CANYONEERING
IN THE SOUTHWEST
© Christopher Earls Brennen

|
|---|

|
Hike A5. Courthouse Rock
- Hiking time: 9.5 hours
- Estimated hiking distance: 2 miles
- Elevation gain: 1300 feet
- USGS Topo Map: Eagletail Mountains East
- Difficulties: Six pitches of technical rock climbing with a few 5.5 moves; poor rock quality in places
- Special equipment: Climbing harnesses, shoes and helmets, two 200ft ropes, two sets of cams with nuts, slings, quickdraws, carabiniers and some webbing
-
ACA Rating: 4A III

Characteristics
As you drive west from Phoenix, Arizona, across the vast flat desert that stretches away into the distance beyond the valley of the sun, there is little to distract your attention from the ribbon of human intervention along which you are travelling. In the summer, the sun bakes everything into the triple digits and only the crazy would venture off the road.
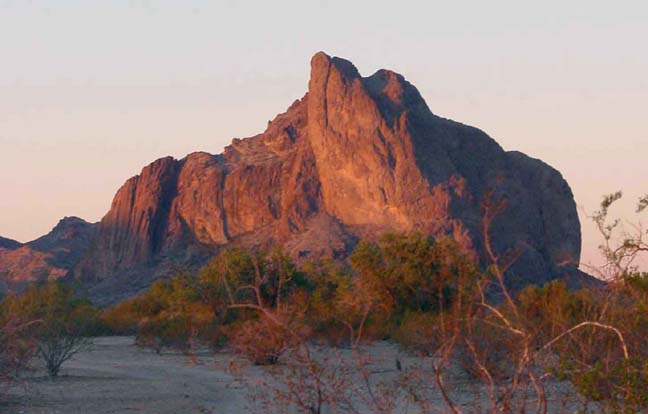
About 70mi west of Phoenix a range of low but rugged mountains rises out of the desert to the south of Interstate 10. These are the Eagletail Mountains, named for the bare granite pinnacles that resemble bird's feathers. And on the near side of this range a stark monolith of rock, huge and sheer-sided, rises majestically out of the desert floor and demands your attention. This is Courthouse Rock, a 2874ft guardian that is an irresistable magnet for climbers during the winter when the temperatures are moderate. This adventure tackles that 1300ft climbing challenge. It is a six pitch ascent with a rating of 5.5. The reward is a spectacular view from the very top of the legendary Courthouse Rock.
Winter is the best time for this adventure. To get an early start, it is wise to camp the night before at one of the trailheads close to the Rock. You can camp almost anywhere in this desert.
Trailhead
About 65mi west of Phoenix, Arizona, leave Interstate 10 at Exit 81, marked Salome Road and Harquahala Valley Road. Follow the paved Harquahala Valley Road south (it travels west for a short way, paralleling the Interstate, before turning south) for 5.0mi and then turn right onto the marked Courthouse Rock Road whose roadsign also reads Centennial Road. Go due west for 7.0mi on the good dirt road heading directly for the rock itself. Then veer right and drive in a WNW direction along a rougher but still 2WD road that parallels a buried gas pipeline. Courthouse Rock now looms high overhead on the left and from the road you should examine the broad northeastern aspect of the monolith. The peak itself is on the right; near the left end you should be able to identify a deep dark gully that reaches all the way up to the long lefthand shoulder of the rock.
Three rough approach roads (high clearance) turn left off the gas pipeline road and provide fairly convenient access to the Rock. From the point where you veered right at the end of Centennial Road, drive 2.1mi along the gas pipeline road where you will encounter a lone pole. The first of the three approach roads, and the one that takes you closest to the climb, turns off to the left at a point (33o28.82'N 113o19.34'W) which is 0.4mi beyond the lone pole. It is 2.3mi along this first approach road to the wilderness boundary where you should park (33o27.62'N 113o20.93'W). Respectively another 0.6mi and 1.6mi further along the gas pipeline road or 3.1mi and 4.1 from the end of Centennial Road are the second and third approach roads. The third has a sign indicating access to the Eagletail Mountain Wilderness Area and is probably the most reliable of the three approaches; it is 1.5mi along it to the Ben Avery Trailhead entrance to the Eagletail Wilderness. However it involves a longer hike to the climbing route.
Hike
From the parking area at the end of the first approach road (33o27.62'N 113o20.93'W and elevation 1570ft) hike across the flat and open desert terrain toward the scree slope below the dark gully at the far left of the east face of the Rock. The hike to the bottom of the scree slope only takes about 15min. (From the Ben Avery Trailhead the hike around the north side of the Rock is about 25min.) Then a brief climb up the scree using a worn use-trail brings you into the depths of the gully about 30min into the hike. The top of the scree slope (33o27.72'N 113o21.46'W and elevation 1910ft) is where the climbing begins. The left wall in the gully is huge and vertical. The right side is broken with a number of ridges running directly up the broad gully.
 | 
| |
|---|---|---|
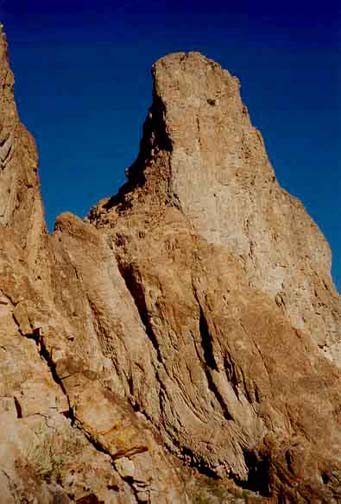
| Courthouse Rock in early morning (Photo by Mark Duttweiler) | Summit block from the scree slope |
Some of the anchor stations or belay points along the standard route are easy to find but others are not. Awkwardly, the anchors for the first pitch are not easily found unless you start up the right ridge. It is the second longitudinal ridge to the right of the streambed by about 20ft; it is also the ridge that appears easiest to climb. Climb about 50ft up along the left side of the arete and then transition about 6ft right onto the arete itself where there is one slightly awkward move (5.3) just below a bolted belay station in a wall to your left. It is probably best to bypass this station, to proceed up an easy gully and then climb left onto a prominent outcropping where there is a second belay station on a big ledge about 170ft from the start. The second, short pitch proceeds left along a ledge and climbs a short chimney in the streamcourse to a broad, recessed platform in the main streambed of the gully. The belay station is on a ledge above the streambed on the right. This easy (5.2) second pitch is only about 50ft. The third pitch is also easy (5.2) and climbs about 160ft directly up the watercourse. It begins at about 2020ft and you should reach this point after 1hr of climbing. A jog to the right and a traverse back left take you to the broad recessed ledge at the top of the third pitch where there is a bolted belay station. At this point the gully widens considerably and there is a more formidable climbing challenge ahead. The fourth pitch (5.5) proceeds up the center of the rockwall for about 160ft. There is a partially bolted route to the left of the center; this includes one key bolt (in the middle of a blackened face and visible from the bottom of the pitch) just below the crux in which the move is back to the right and up to the top of the pitch. Some recommend climbing to the key bolt, hooking in, descending about 10ft and then swinging over to the right where there are more features. However, our preferred alternative is to climb straight up the center about 12ft to the right of the bolts. The climbing there is much easier; the problem is in finding a way to install adequate protection over the central part of the climb. Nearing the top there are several ledges and cracks that allow for more comfortable climbing. The top of this 160ft fourth pitch (at 5.5 the most difficult pitch on the ascent) is a bolted anchor station on a small but secure ledge. You should reach this 2230ft elevation about 3hr after the morning start.
 | 
| |
|---|---|---|
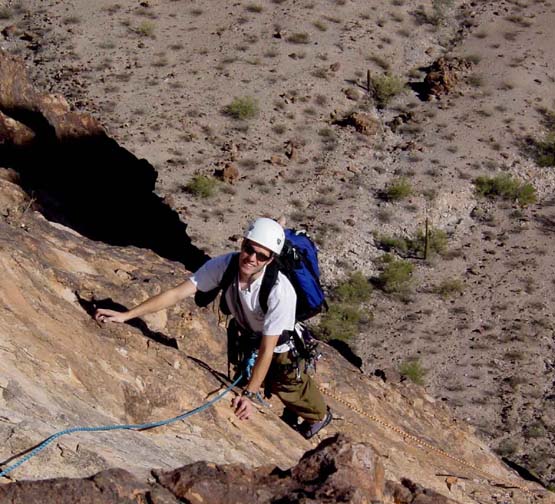
| Leading the fifth pitch | On the fifth pitch in the great gully |
The fifth pitch (5.2) proceeds up a more gently sloping and flat rock face to a bolted belay station just below the shoulder ridge of Courthouse Rock. A nice dihedral crack provides protection for the first 25ft. Beyond this secure anchor points are hard to find but it is easy friction climbing straight up about 120ft to the bolted anchor station at the top of the great gully. You should reach this point after 3.5hr of climbing.
Here it is wise to change out of climbing shoes and into hiking footwear. Climbing to the ridge-top, you hike north for about 0.25mi along the broad top of the shoulder, descending a little to pass to the right of and around the bottom of a rock mass that rises from the middle of the shoulder. Between that rock mass and the prominent summit block off to the right, is a steep gully. As you pass around the bottom of the rock mass, veer left and enter that broad hard rock gully. Climb up the streambed to a point close to the top of the gully, while carefully noting the features of the summit block wall on your right. One final pitch of roped climbing will take you to the top of this wall but careful navigation is needed to locate that pitch. As you near the top of the gully, look carefully for a series of class 3 ledges, the first of which traverses back to the right from near the top of the gully. A second switches back to the left for a short way and the third, back to the right, accesses a broad platform at the base of a prominent dihedral with a squeeze chimney behind it to the right. (An old rappel webbing wrap around the base of a large rock on this platform may help confirm that you are in the right place.) The chimney is the start of the last roped pitch (40ft, 5.4). Climb up the chimney to a recessed platform with a single bolt, and continue up on a small arete above the recess. A small ledge leads to a place where there is an exposed and awkward boulder step-around to the right. The three bolt belay station is just above this step-around.
|
|---|
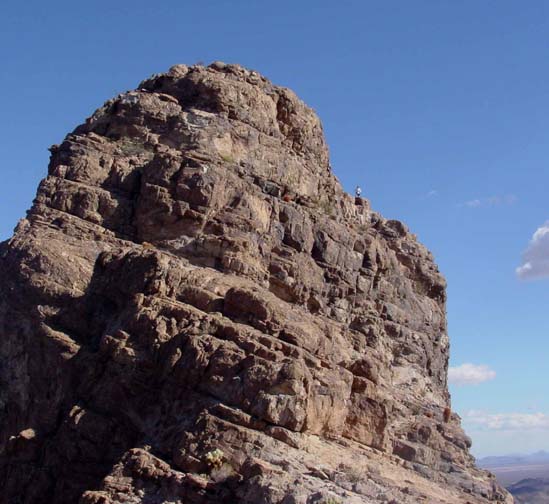
| Summit block from the ridge saddle with author on the right shoulder |
| (Photo by Mark Duttweiler) |
It is just a few steps from the belay station to a broad and shallow saddle that leads to the summit block. Leaving your equipment at this saddle, climb directly up the rocky apex of the summit block (class 4) to a false summit. Then dscend a short way to the left in order to walk around a spectacular slit in the summit block. The short trail to the cairn at the top is obvious. You should reach the 2874ft summit (33o27.86'N 113o21.65'W) about 5hr 20min after the morning start.
The view from the summit is truly spectacular. Off to the southeast you can see the distinctive Eagletail pinnacles; the range of that name skirts around to the south. In other directions the seemingly endless desert is strewn with random rocky peaks and small mountain ranges. To the north the ribbon of Interstate 10 seems in constant motion. Closer at hand and thousands of feet below, the vehicles parked at the Eagletail Wilderness Trailhead (off to the NNW) seem tiny. Even more dramatic sights are visible to the south and west if you venture to the south edge of the summit platform. From there you can trace your ascent up the five-pitch gully, across the shoulder, up the hard rock gully and the sixth pitch to the summit ridge.
The descent follows the same route except at the sixth pitch, where you can rappel about 190ft (including about 50ft of free rappel) from the belay station at the top of the sixth roped pitch to the ledge just above the hard rock gully. Hiking back to the five-pitch gully, you follow the ascent route on the top three rappels, which measure about 120ft, 160ft and 160ft. The penultimate rappel (50ft) begins and ends at the end points of the second ascent pitch but takes a straighter line while the last rappel (170ft) proceeds down over the front of the prominent platform rather than following the ascent route that came up on the left. Perhaps the trickiest rope pull is at this last rappel where the bolts are at the back of the platform; the last rappeller needs to be careful not to lay the ropes down in one of several notches that can trap a knot.
You should reach the bottom of the great gully about 9hr after the morning
start. The hike back to the vehicles should only take about 25min.
Christopher E. Brennen