ADVENTURE HIKES AND CANYONEERING
IN THE SOUTHWEST
© Christopher Earls Brennen

|
|---|

|
Hike A11. Cibecue Creek
- Hiking time: 7 hours
- Estimated hiking distance: 5.4 miles
- Elevation gain: 450 feet
- USGS Topo Maps: Mule Hoof Bend (AZ)
- Difficulties: One moderately challenging 50ft climb, two rappels of 50ft, one with whitewater, some swimming and an optional, challenging whitewater ascent through a 6ft wide narrows.
- Special equipment: Harnesses and rappelling gear, 160ft rope, 100ft rope, 20ft webbing, drybags, wetsuit and non-slip soles
-
ACA Rating: 3C III

- Guide and Permit: This hike requires a permit from the White Mountain Apache Tribe and, in addition, hiking above the lower falls is not permitted unless accompanied by a tribal guide
Characteristics
This gem of a canyon on the White Mountain Apache Reservation in eastern Arizona only has a few technical challenges but they are spectacular and varied. Because the land belongs to the tribe you must be accompanied by a tribal guide and this needs to be arranged ahead of time.
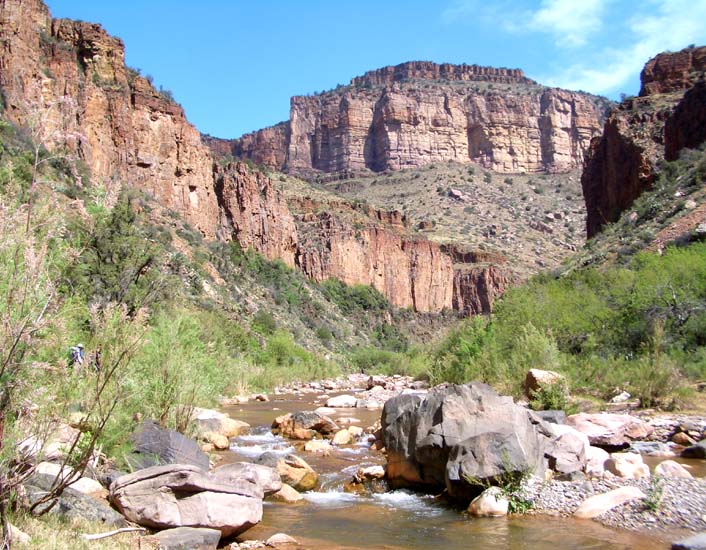
It is an up and back hike in a tributary of the Salt River known as Cibecue Creek; Cibecue is Apache roughly translated as ``surrounded by red cliffs''. The name is appropriate for you ascend through layers of sandstone cliffs sculpted by the year-round river. Though you will not be in the river very long, it would be wise carry a wetsuit for the water can be cold and deep in places. Two rappels, one in whitewater, and a challenging narrows provide the excitement in this neat canyon.
Trailhead
This hike is located in the White Mountain Apache Indian Reservation and you must therefore obtain a day hiking permit from the tribe before venturing off the paved highway. A permit allows you to hike up Cibecue Creek to the bottom of the Lower Falls. But to climb above the Lower Falls and proceed further upstream you MUST BE ACCOMPANIED BY A LICENSED GUIDE from the White Mountain Apache Tribe. Our guide, Greg Henry, was excellent and can be contacted at (928)-207-5727. For more information see the White Mountain Apache website at http://www.wmat.nsn.us/ or contact the WMA Wildlife and Outdoor Recreation Division at (928)-338-4385.
The White Mountain Apache Indian Reservation is located in eastern Arizona. Drive 38mi northeast from Globe or 48mi southwest from Show Low on Highway 60 to the Salt River Canyon. From either direction the road drops dramatically about 1400ft into this spectacular canyon to cross the Salt River by way of a bridge at the southern boundary of the White Mountain Apache Reservation. At the southern end of the bridge there is a parking area where we met our guide, Greg Henry, and completed the necessary formalities for the day-long adventure. The day hiking license will cost $15.00 per person at the outset and you should add a generous tip at the end of the day. Greg was particularly helpful, technically competent and friendly.
From the parking area at the south end of the Highway 60 bridge over the Salt River (33o47.83'N 110o30.11'W and elevation 3400ft) we drove across the bridge, up a grade for 300yds and then turned left onto a dirt road. We drove west on this good dirt road for about 4.5mi, paralleling the Salt River. Some distance past the Second Campground, we arrived at a shallow ford through Cibecue Creek which enters the Salt from the north. Immediately after the ford we turned right up into the trailhead parking area.
Hike
From the trailhead parking area at 33o50.30'N 110o33.32'W and an elevation of 3160ft, the ascent of Cibecue Creek involves easy boulder-hopping and stream-wading. After about ten minutes you pass the gaging station and after twenty a large canyon enters from the west. Gradually the walls close in and interesting rock formations appear such as alcove on the east side after about 40min. The rock here tends to fracture into rectangular features and so the overhanging walls are worn into rectangular subway-like features that become more evident as you near the Lower Falls. There at 33o51.32'N 110o32.78'W and an elevation of 3390ft the walls close in completely forming a spectacular 50ft vertical waterfall that is recessed in a sunless grotto and plunges into a deep pool. You should reach this point 1.6mi from the start after a 1hr hike.
 | 
| |
|---|---|---|
| Entering Cibicue Canyon | Lower Falls |
The walls on both sides of this recess are vertical but 50ft up on the east is a broad ledge that allows passage past the Lower Falls. However the vertical climb up to this ledge requires some rock-climbing experience. About 100yds south of the falls there is a reasonable climbing route where the best climber in your group should be able to get to the ledge without technical assistance and thus be able to belay the rest of the party up to that point. The most difficult move is around the left side of a rock projection about half-way up; once on the ledge above this projection the rest of the climb is easy.
Given time to admire the falls and complete the climb it will be about 2hrs from the start before you are ready to proceed beyond the Lower Falls. The falls are easily bypassed along the broad ledge on the east side. However, once past the falls you should climb onto the shelf on the west side and follow that side for the next mile or so. The river below you on your right proceeds over many small falls and through some lovely pools. It is a broad canyon walk for the next mile or so before the canyon begins to close in again. About 1hr and 1mi above the Lower Falls the canyon narrows to the point where you must wade and you are now close to the bottom of the section of Narrows for which Cibecue Creek is well known. At this point at 33o51.73'N 110o32.02'W and 3540ft and 2.6mi and 3hrs from the start there are two options for you to consider:
Option One is to forego trying to ascend the Narrows, the most technically demanding and physically exhausting part of this adventure. After all you can get a close look at them on the descent. Instead you can cross to the east side before any wading is needed, climb onto a shoulder and find a rough use-trail on the east side that proceeds up on a shelf that bypasses the Narrows and the Upper Falls and descends to the canyon bottom above the falls. Along this trail you will get an excellent view of both the Narrows and the Upper Falls but it is sketchy in places so proceed with care.
 | 
| |
|---|---|---|
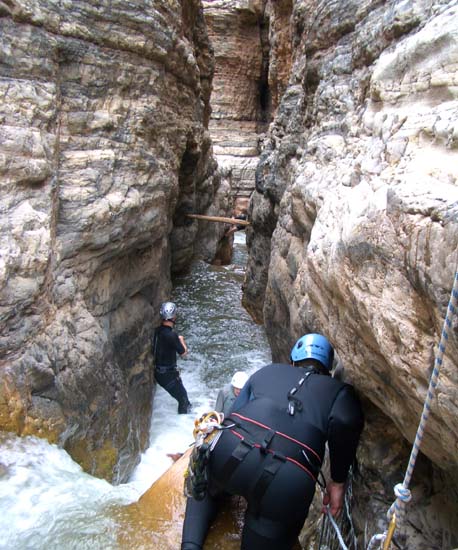
| Narrows below upper falls | Guided rappel of the upper falls |
Option Two is to proceed upstream against the water flow. The wade begins easily. Then, for about 50yds the canyon narrows to about 10ft in width and you have to pick your way along underwater ledges and through shallow sections. After this the going gets tough. The canyon narrows to about 5ft in width so that the depth and water velocity make it impossible to progress without using purchase on the walls. If you are limber and long-legged enough you may be able to stem upstream above the water with one foot on each wall. You can also stem in the water where you don't have to hold your full weight but you do have to fight the current. After about 30yds there is a 6ft waterfall to overcome and here it is necessary to stem up above the water surface but fortunately there are adequate footholds on both walls. Above the waterfall is another 20yds of stemming before you arrive at the last and most difficult obstacle, another 6ft waterfall around a big chockstone that creates a substantial overhang. Your best climber may be able to ascend this by stemming though it is more difficult than the earlier falls. Alternatively you may be able to lasso the chockstone with a loop of webbing and provide a foothold for the climb. Once one person has ascended, that person can rig a rope or webbing from a bolt on the left hand side to aid the remaining climbers. Above this obstacle the canyon widens and you find yourself at the base of the Upper Falls. Climb the sloping cliff face on your right up to the aforementioned use-trail in order to get above these Upper Falls (it is also possible to climb and bypass the falls on the left).
Whichever option you choose you will now be above the Upper Falls at 33o51.69'N 110o31.93'W and an elevation of about 3600ft having travelled 2.7mi after about 4hrs of hiking. The Upper Falls are preceded by a series of attractive pools and, on a warm day, one particular deep pool just before the falls is bound to invite a jump and a swim.
The anchor for the rappel descent of the Upper Falls (assuming that you don't choose to return along the use trail) is a set of bolts on the right side just above the lip. The 50ft sloping rappel from there to the bottom of the Upper Falls is not as fierce as it looks provided you keep your footing in the crashing stream. Another possibility is for the first descender to set up a guided rappel using the anchor bolts at the bottom on the right.
Whichever method you choose to descend the Upper Falls, the rappel leaves you back at the top end of the Narrows. The descent through this maelstrom is much easier than the ascent. First you can rig a rope to the anchor bolts on the right to rappel or handline down the first 6ft waterfall. Then you can go with the flow to the top of the second 6ft drop, jump that and float on out of the Narrows. You will arrive at the end of the Narrows about 5hrs from the morning start.
The 1mi return hike to the Lower Falls should take about 40min and here again you have a choice, whether to rappel down the 50ft cliff by the dry route or the more daring wet route. The wet route uses an anchor bolt in the rock about 40ft downstream of the main falls and deposits you in the deep pool at the bottom where a swimming disconnect is necessary. The dry route utilizes a stout tree anchor about 70yds downstream of the falls and leaves you on a gravel bed beside the river.
From the bottom of the Lower Falls it takes about 50min to hike
back to the trailhead and complete the day's adventure. The total duration
will be about 7hrs during which you will cover about 5.4mi.
Christopher E. Brennen