ADVENTURE HIKES AND CANYONEERING
IN THE SOUTHWEST
© Christopher Earls Brennen

|
|---|

|
Hike D5. Behunin Canyon
- Hiking time: 8.7 hours
- Estimated hiking distance: 5.9 miles
- Elevation gain: 2320 feet
- USGS Topo Map: Temple of Sinawava or Zion National Park Topographical Map
- Difficulties: Eight rappels up to 165ft, some wading
- Special equipment: Rappelling gear, harnesses, helmets, 60 meter rope, 30ft webbing, and 200ft recovery cord
- Permit: Obtain permit from Backcountry Desk in Zion National Park Visitor Center.
-
ACA Rating: 3A III

Characteristics
Zion National Park in southwestern Utah is one of loveliest places on earth. But if you visit it in the usual way, by driving up into the main canyon where it opens up into the desert and if you do not venture far from the road you will only have seen a fraction of this beauty. Beyond the asphalt, lie magnificient sculptured canyons, luxurious grottoes and awesome carved sandstone ravines that can only be reached on foot and, sometimes, only by swimming and rappelling.
Behunin Canyon is one of the more challenging canyoneering adventures in this wonderland. It is a demanding, all-day hike with about 8 rappels including the last, a 165ft free rappel down the main Zion Canyon wall to the Emerald Pools area. Unlike some of the other advanced canyoneering adventures in Zion, Behunin Canyon is almost dry and hotter than the others because of the exposure. Consequently this adventure may be best in the spring or fall.
Trailhead
Park at the Visitor Center in Zion National Park and catch the Zion Canyon Shuttle Bus to Grotto parking area (37o15.56'N 112o56.99'W). You will return directly to this same parking lot.
Hike
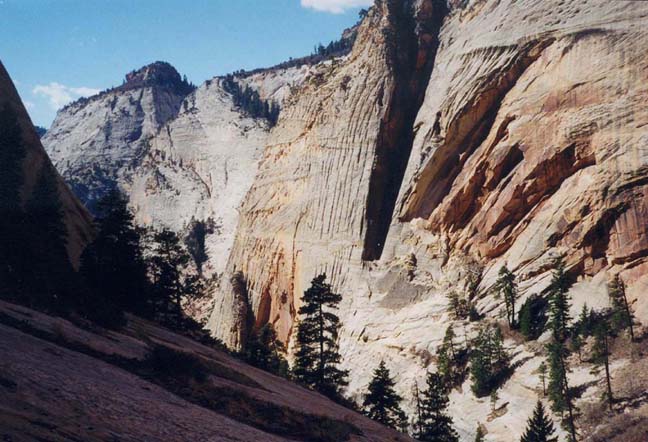
Cross the Virgin river by the footbridge (elevation 4300ft) and turn right following the signs for Angel's Landing. After a brief stretch along the river bank, the trail climbs the west wall of the main canyon and contours into Refrigerator Canyon at an elevation of about 4930ft. In the heat of summer the cool, relatively level hike up Refrigerator Canyon will be a welcome but brief respite. Soon, the trail climbs precipitously up the right wall of Refrigerator utilizing the famous Walter's Wiggles to reach Scout Lookout (37o16.50'N 112o57.04'W). Pause here 2mi from the start at an elevation 5350ft to absorb the breath-taking views from this aerie. The trail to the 5790ft Angel's Landing proceeds south, climbing the apex of the ridge to an awesome perch high above the the main Zion Canyon. If you choose to make this side-trip it will add about 1hr to the adventure. Otherwise proceed in the other direction, north from Scout's Lookout. The well-marked trail climbs a much easier ridge to a broad, flat shelf whose top (elevation 5860ft) is mostly bare rock. It then descends to a wooden footbridge across a small but deep gully. You should reach this bridge (elevation 5520ft) about 2.7mi and 1hr 45min from the start. From this low point the trail climbs across the north face of Mount Majestic and up into the narrowing canyon between Mount Majestic and the mass of the West Rim. The drop-in point for Behunin Canyon (37o16.96'N 112o58.18'W) is the saddle at the top of this climb; you should reach this 6280ft elevation about 2hr 20min or 3.5mi from the start. The West Rim trail turns right and continues to climb toward the plateau high overhead. However, the head of Behunin Canyon lies below you to the west, easily recognized by its spectacular headwall, a massive and bright sandstone cliff painted by eons of water runoff.
|
|---|
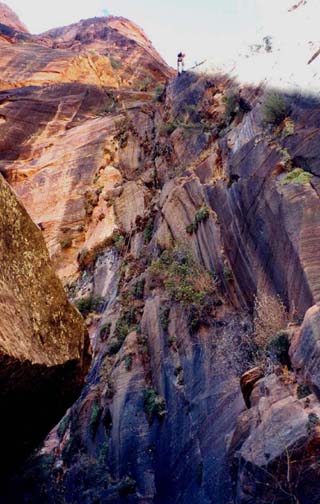
| Behunin Canyon from the drop-in saddle |
The drop-in is quite easy. After hiking down through the manzanita turn left and traverse the slickrock toward the towering headwall. Then descend the scree slope under the headwall to the start of the streambed. The going is quite easy for the next mile or so with only occasional obstacles, all of which are readily circumvented or downclimbed. The walls on either side are steeply sloping but not vertical, allowing for more sunshine to penetrate and more vegetation to thrive. But after a mile Behunin suddenly turns left and drops off precipitously (37o16.31'N 112o58.07'W). It is a drop of almost 500ft that takes 4 dramatic rappels to descend. You should reach the top of this challenge (elevation 5700ft) about 3.5hr or 4.2mi from the start.
 | 
| |
|---|---|---|
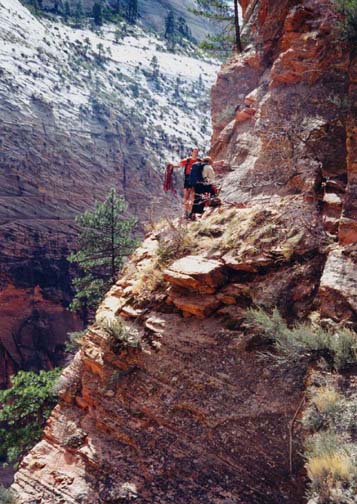
| Top of first rappel | The first rappel |
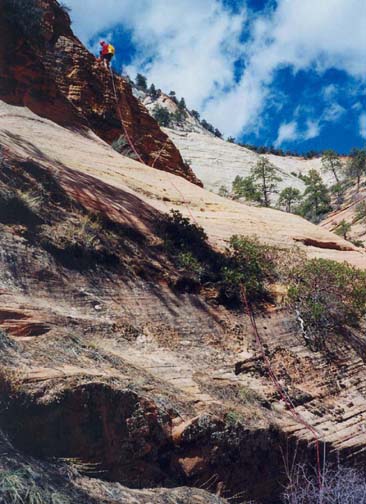
The two-bolt anchor for the first, 70ft rappel is out along a ledge on the right. Descend from there to the obvious large tree slightly off to the right. Using that tree as anchor, rappel straight down about 120ft over sloping slickrock to a smaller tree on the edge of a substantial precipice. The third rappel uses the small tree as anchor and dramatically descends 160ft to a flat-bottomed recess in the cliff. The rope recovery from this third rappel can be a little difficult so the last person down should try to avoid laying the rope down in one of the grooves in the sandstone cut by previous canyoneers. The fourth and last rappel in this big-wall series is anchored by a set of bolts at the edge of the recess. It descends about 100ft to the sandy canyon floor (elevation 5200ft). You should reach this point a little under 5hr from the start. It is a good place for lunch and a brief rest.
 | 
| |
|---|---|---|
| Looking down second rappel | Fourth rappel |
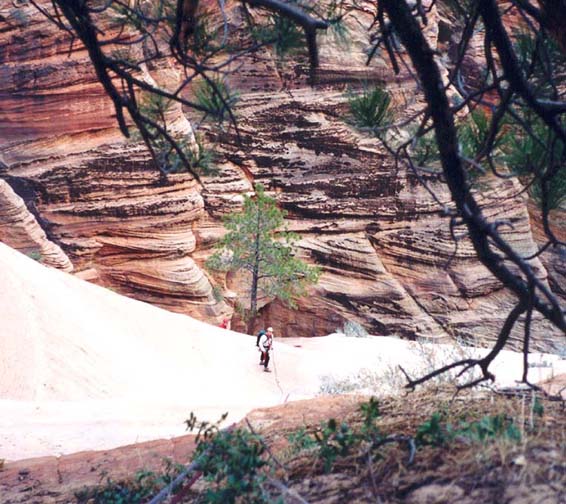
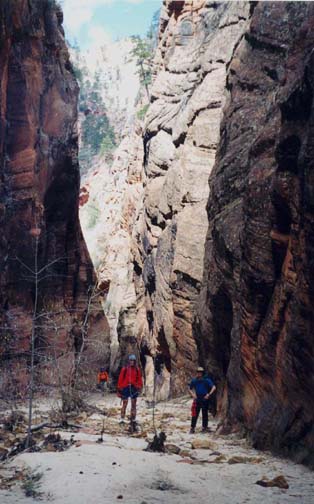
Once revived, proceed down the sandy-bottomed canyon for several hundred yards until you arrive at the top of a 50ft dryfall. Here, some have downclimbed the sandy and rock-filled watercourse but then have had to rappel the last 20ft from a small tree. It is much easier to locate the set of bolts on the broad shelf on the right and to rappel the whole way from there. After this obstacle the bottom of Behunin continues flat and sandy and the vertical walls close in to form a classic section of deep narrows. Soon, you come to a short, very narrow section with a thigh-deep pool. It is probably best to wade this pool though some have climbed around on the left using a sketchy rim about 6ft above the water. This wade is immediately followed by a much larger pool below a 6ft drop that would require a 15yd swim but is better bypassed by following the use-trail up a steep wooded bank on the right. This descends to the canyon floor downstream of the pool. Shortly thereafter you arrive at an awkward 10ft drop that is best negotiated using a bypass very similar to the pool bypass of a few minutes before. Climb the steep wooded slope on the right and descend a few yards downstream.
 | 
| |
|---|---|---|
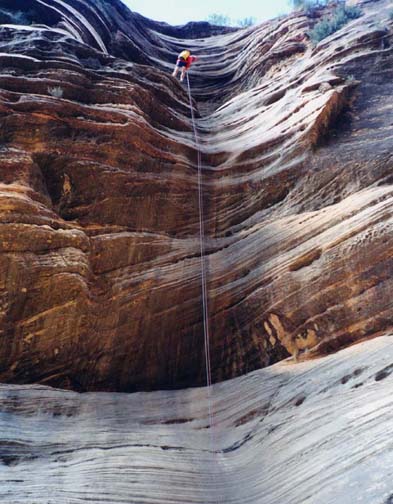
| Behunin narrows | The last 165ft rappel |
Just a short distance downstream you will arrive, 6.5hr and 4.8mi from the start, at the beginning of the final series of rappels. The top of the first rappel, still inside the canyon, is an awkward area of broken boulders and steep sandy gullies. There are two trees one about 25ft above the other that have been used as anchors. From the lower tree it is a 50ft rappel down to the canyon floor. Before pulling the rope you may choose to continue the rappel down an awkward 10ft slot drop in the watercourse that is much undercut. Alternatively there is a narrow ledge on the right that bypasses the slot drop.
Just a few yards beyond the slot drop you will come to the end of Behunin Canyon at an elevation of 4900ft having travelled for 6hr 50min and 4.8mi. A spectacular panoramic view of this part of the main Zion Canyon opens up before you. Below is the great amphitheater on the west side of Zion Canyon that contains the Emerald Pools, a very popular and short hike for Zion tourists. Two trails, one above the other, lead up to the lower Emerald Pool from the south, from Zion Lodge. Another trail that is not visible since it is directly below you leads to the Lower Emerald Pool from the Grotto Parking area. It is, however, a 300ft vertical drop from where you are standing to the top of the scree slope in the main Zion Canyon, an awesome and daunting prospect. A little downclimbing and two big rappels are required to make the descent. The first task is to climb around a large canyon-blocking boulder. This is best done on the left side of the boulder and it is wise to belay each other since the shelf on the downside of the boulder is sloping and exposed. The anchor for the penultimate 120ft rappel is under the canyon-blocking boulder. From here you first rappel down a section with about 40ft of free rappel to a shelf and then continue past a logjam (probably temporary) to a large, flat, recessed shelf of rock, a comforting rest stop before the final challenge.
The bolted anchor for the final big rappel (37o15.61'N 112o57.73'W) is found by dropping down from the flat shelf into the gully on the left and following that short gully under a small chockstone to where the stream plunges straight down the cliff. The bolted anchors are just to the left of the lip. From here it is a 160ft rappel to the scree far below. The entry is easy and the first 20ft are sloped. The last 140ft are free and you will be some considerable distance from the cliff, hanging in mid-air in Zion Canyon. It is indeed an awesome experience; take your time and enjoy the view. You will touch down between the cliff and a large block that separated from the cliff some time in the past. You should reach this point (elevation 4600ft) about 8hr after the morning start.
From the touchdown point, there are some bouldering
challenges ahead as you continue down the streambed.
However, when you see a good use-trail you should leave the
streambed and traverse left for an easier descent down a brushy slope.
This will intersect the trail that leads from the Lower Emerald Pool
to the Grotto Parking Area. Turn left, take the high trail at several
junctions and follow this, the Kayenta trail, back
to the Grotto Parking Area about 1mi away. You should arrive back
at the starting point 5.9mi and 8hr 40min after starting out.
Last updated 4/1/02.
Christopher E. Brennen