ADVENTURE HIKES AND CANYONEERING
IN THE SAN GABRIELS
© Christopher Earls Brennen

|
|---|

|
Hike D9. Middle Muir Ravine
- Hiking time: 10.5 hours
- Estimated hiking distance: 7.6 miles
- Elevation gain: 300 feet
- USGS Topo Maps: Mount Wilson
- Difficulties: About 12 rappels up to 110ft, substantial downclimbing, much bushwhacking and some swimming
- Special equipment: 200ft rope, 60ft rope, 100ft webbing, rappelling gear with 12 rappel rings, dry bags
-
ACA Rating: 3B IV

Characteristics
The Muir Ravines are a series of three rugged and precipitous side canyons that descend the southeastern slopes of Muir Peak to meet the lower section of Eaton Canyon. The descent of Middle Muir Ravine has two parts, an unpleasant and extended period of bushwhacking in the upper canyon followed by a spectacular, exhilerating and precipitous descent into Eaton Canyon. The latter visits one of the most awesome viewpoints in the San Gabriel mountains at a place called the Eagle's Eerie. The descent of Middle Muir involves about 10 rappels (followed by four more in Eaton Canyon) some of which are part of multi-pitch descents. Though the price paid in the long approach and unpleasant bushwhacking is high, the lower Middle Muir is a spectacular adventure for the experienced canyoneer.
It is also a long, tough day, partly because of the bushwhacking and number of rappels, partly because of the long approach and partly because of the long and wet descent of Eaton Canyon downstream of the confluence. The ravine itself can be hot and is usually dry but it is followed by the numerous cold water swims in Eaton Canyon. Consequently care should be exercised in choosing the right day for this adventure. It is best for a cool fall day with sufficient daylight but before the rains have swelled the Eaton Canyon flow. This probably means that you will need to carry a wetsuit for the Eaton Canyon section. Be sure to carry adequate water for the long, dry approach hike and the descent in the ravine (at least 3 liters) plus a filter for when you reach Eaton Canyon. This is such a long day hike that a small, fast and experienced group (three or four people) is recommended.
Trailhead
The hike requires a long car shuttle. First leave one vehicle near the gate on the Mount Wilson Toll Road (2N45). Drive north or east on Altadena Drive, turn north on Mendocino Lane and immediately east on Pinecrest Drive. You may have to park on Mendocino because of parking restrictions on Pinecrest. But it is still just a short distance along Pinecrest to the Mount Wilson Toll Road gate (34o11.51'N 118o6.33'W and elevation 1300ft). Then drive south again to the 210 Freeway and follow it west to the Angeles Crest Highway. Drive north on the Angeles Crest Highway to Red Box where you turn right onto the Mount Wilson Road and proceed 2.3mi to the overlook at Eaton Saddle (34o14.36'N 118o5.60'W and elevation 5090ft). Park in the broad dirt area.
Hike
Once you pass the metal gate across the Mount Lowe fire road (34o14.36'N 118o5.60'W and elevation 5090ft) you are immediately rewarded by a spectacular view down into the cliff-ringed amphitheater that is the head of Eaton Canyon. Take a moment to enjoy these spectacular surroundings before proceeding up the fire road and through the tunnel, gaining elevation as you approach Markham Saddle and its watertank (elevation 5260ft). Continue along the gently descending fireroad as it rounds the west side of Mount Lowe and reaches the Mount Lowe junction at 4470ft (and 34o13.46'N 118o6.61'W) about 1hr and 3.2mi from the start. At this junction follow the signs for Inspiration Point and hike the gently ascending fireroad for 0.25mi to this popular overlook. Inspiration Point is at 34o13.27'N 118o6.55'W and an elevation of 4500ft. After a brief stop, continue hiking east along the good, level, dirt road that eventually rounds Muir Peak (4688ft) at a prominent hairpin bend with a watertank above it. Immediately beyond the hairpin the road overlooks Middle Muir Ravine and you can drop in anywhere here. The object is to find the least brushy route for the initial descent though almost all routes require substantial bushwhacking. In this regard, the best drop-in point is probably about 100yards beyond the hairpin where the initial descent has a few clearings and some animal trails. This drop-in point is at 34o12.90'N 118o6.10'W and an elevation of 4500ft). You should reach this point about 1hr 40min from the start having travelled 4.3mi.
|
|---|
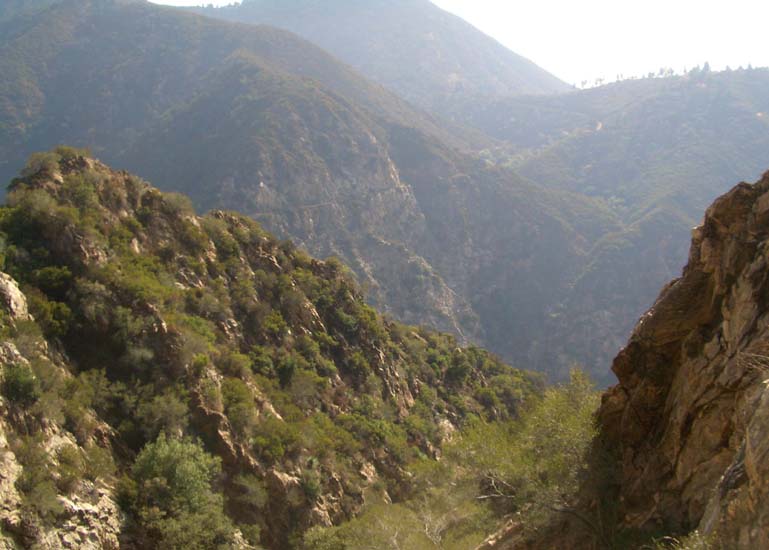
| View from third rappel - Telephone Trail in the distance |
Beginning at the drop-in point and extending below it for about 900ft of elevation loss, the descent in the Middle Muir Ravine requires almost continuous bushwhacking. Initially there are some small clearings and animal trails through the brush. Stay near the low point in the canyon and follow the open gully washes where they exist (often they peter out). When the canyon deepens, the brush continues. Several similar gullies join from the left (for example at 3790ft and at 3710ft) and each time the brush eases a little. At an elevation of 3630ft, the canyon has a kink as it winds its way past some rocky bluffs. Finally at 3390ft and about 2hrs after the drop-in (3.5hrs from the start) you will arrive at the top of the first rappel, a vertical 40ft descent from a bush anchor on the right. More bushwhacking follows and about 20min later at an elevation of 3230ft you come to the second rappel, a 100ft vertical drop from an anchor bush on the left.
Finally, at an elevation of about 2950ft and about 3hrs 15min from the drop-in, the bushwhacking is behind you, the canyon steepens markedly and you begin the dramatic and precipitous descent into Eaton Canyon whose far wall can be glimpsed in the distance. This steepening begins with some bouldering including a clamber under one big boulder as well as some downclimbs. Shortly thereafter in a narrow section of canyon with a small window of view ahead, that view explodes and you arrive at the top of a huge drop that requires three consecutive rappels. The first is a 100ft sloping drop down granite bedrock from a wedged rock anchor in midstream a short distance back from the lip. This deposits you onto a platform where a bush on the right anchors the second step, a short 20ft rappel down onto a small shelf. There a large bush on the left provides an anchor for the third step, an 80ft rappel down onto a shelf with a walk-off to the left.
 | 
| |
|---|---|---|
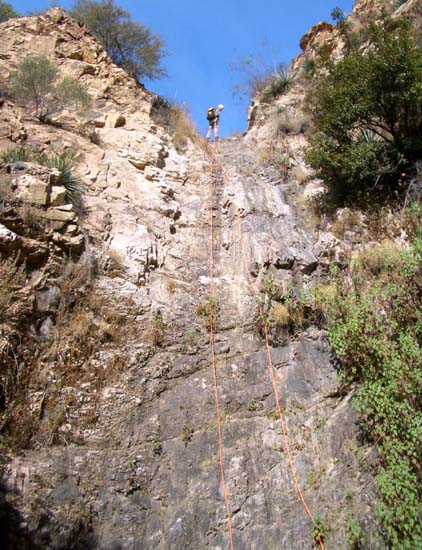
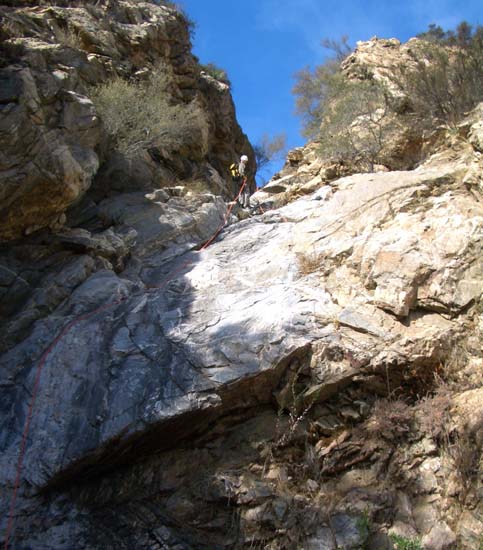
| Second rappel in Middle Muir Ravine | Third rappel in Middle Muir Ravine |
This three-step drop is followed by a series of downclimbs in a narrow slot characterized by friction slides and culminating in a short 20ft rappel from an anchor around a large yucca on the left. At an elevation of about 2400ft this is shortly followed by another small, sloping 20ft rappel using a bush on the left as the anchor. This brief respite from the precipitous final descent is about to end for just around the corner where the bedrock canyon narrows and the view ahead is just a narrow window, you become aware of an awesome drop ahead. Arriving at the window you are treated to a marvellous overview of Eaton Canyon whose river can be heard a jaw-dropping 340ft below this Eagle's Eerie. Directly ahead on the other side of the canyon you can see the promontory behind which Telephone Flat is located and to the right of that the Telephone Trail that contours down to Telephone Flat. Further to the right you get a good view of the lower reaches of Esme Canyon as it descends to join Eaton. On the other side, to the left of the promontory you can sense where the upper narrows of Eaton lie, though you cannot see into them. You should reach the Eagle's Eerie at an elevation of 2390ft about 4hr 45min after the drop-in (6.5hrs from the morning start).
|
|---|
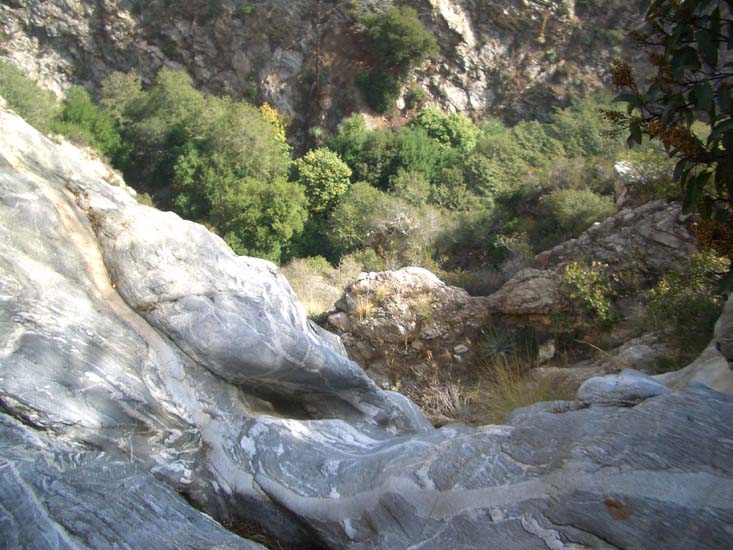
| Looking down into Eaton Canyon from below the Eagle's Eerie |
The descent to the canyon bottom from the Eagle's Eerie requires three consecutive rappels. The lip of the Eerie comprises several small potholes in a narrow slot and, using a human belay in one of these, your best climber should contour around to the right of the lip to a stout bush that is the best anchor for the first of these rappels. From this bush, you rappel vertically down about 80ft into a slot with a comfortable hanging shelf at the right end. There another bush at the right provides the anchor for the second step, a vertical 100ft drop onto a broad shelf with a tall lip ridge. Hike down this shelf to the left to where the shelf ends. There select one of a group of bushes as anchor for the final rappel, a 110ft drop down into a side drainage to the left of the main discharge from Middle Muir. With a 200ft rope you will need a short peice of additional rope or webbing for the pullcord; send one person down first on a long single line and then set up the pullcord.
This final rappel in Middle Muir Ravine deposits you on a steep scree slope in this small side drainage. Stay to the left as you descend the final 100ft into Eaton Canyon. You should reach the confluence at 34o12.20'N 118o5.65'W and an elevation of about 2050ft about 7.5hrs from the morning start having travelled about 5.4mi. It is a good place to rest and prepare for the very different challenges in the water of Eaton Canyon during your descent to the trailhead.
The descent through Eaton Canyon from the confluence is covered in the Lower Eaton Canyon hike; the confluence is just a short distance downstream of the narrows in Eaton. Downstream of the confluence there is a long stretch of canyon without any major obstacles. It is a pleasant and wooded with many potential camp sites should you choose to overnight here. Approaching the end of this section you will recognize that a large canyon is entering from the left. This is Esme Canyon. Just after this junction, Eaton Canyon makes an abrupt right turn and immediately narrows. Here one must negotiate a series of small slides each of which plunges into a deep pool requiring swimming. This series culminates in a vertical, 12ft waterfall that drops into a swimming pool. Though modest, this small waterfall presents a dilemna for the nearest secure anchor is quite some distance upstream requiring the use of a substantial length of webbing. The young people I was with belayed me as I rappelled. I then checked out the pool and they jumped.
Continuing downstream, you encounter a small but awkward waterfall that proceeds through a narrow slot between rock walls in which several large boulders are jammed. Descend using one of these large rocks as anchor. Further downstream, there are many smaller obstacles in the canyon bottom but only one that causes any hesitation. This is a large and deep pool between vertical walls and fed by a small waterfall, only about 3ft high. The pool is over 6ft deep and you must therefore swim across it. On the way downstream it presents a minor hurdle for it is relatively easy to slip into the pool from above. However, when hiking upstream on another occasion, it presented a substantial obstacle for it proved very difficult for the first person to clamber up the falls from a swimming position in the pool. Because of the heroics of one of our party, we came to call this ``Naked Triumph Falls''.
Just downstream there is a place where a thick log is jammed between the two sides of the canyon high above the stream, seemingly holding the canyon walls apart. One wonders how long it can remain suspended. A short distance downstream of this oddity, you will encounter a small dam about 6ft high that, many years ago, served as a reservoir for a water supply to the basin far below. The water from this reservoir flowed through a pipe that led through a tunnel in the left wall of the canyon. The tunnel entrance is about 20yds downstream of the reservoir just above the canyon floor. Twenty years ago it was still possible to get through this tunnel, walking along the pipe, to emerge at a point we will encounter a little later. However, the other end of the tunnel is now blocked by a stone wall.
Several hundred yards beyond the dam you will come to a small 15ft waterfall that must be rappelled. The anchor is a stout tree on the right but the entry to this rappel is very awkward because of the overhang. Moreover the pool at the bottom is often deep and must be swum. Another small waterfall with a large deep pool follows immediately. At present this can be bypassed by walking along a very large log that spans the falls and the pool on the right. But when this log floats away you will have to swim this pool.
There follows another section of wooded canyon before you arrive at the penultimate waterfall, a 50ft vertical drop from a narrow rock slot. Here there are several routes of descent. If you climb the steep slope on the right you will find a use-trail that easily bypasses the falls. Alternatively, on a hot day, it is a fun, wet rappel into a deep pool though you need to be prepared to rappel while in the main water stream. For an anchor, wrap one of the large rocks a short distance upstream of the lip. It is just possible to avoid the main stream by careful route selection on the right (as you look downstream). But the pool at the bottom usually must be swum whatever rappel route you use. Finally we note that many young people choose to slide down these falls, the little chute at the top projecting them into a free fall to the deep pool below. Downstream of this waterfall, there is another wooded section before you finally arrive at the top of the 60ft Eaton Falls. Currently there is a two bolt anchor on the left wall that can be used for this rappel. Like the penultimate falls this is a very wet descent in the main stream. The entry on the left is quite dry but it then becomes very difficult to avoid an encounter with the main falls. Near the bottom you can veer to the right before dropping into the pool at the base that often requires swimming. You are likely to have a sizeable audience for this descent of Eaton Falls for it is a favorite picnic spot.
Downstream of Eaton Falls to the entrance of Eaton Canyon is an easy
hike of about 0.5mi. With a final short haul up to the
Mount Wilson Toll Road from under the bridge and then up the road to the
gated entrance to the
Toll Road (34o11.51'N 118o6.33'W and
elevation 1300ft)
you will come to the conclusion of this challenging adventure about
10hrs 30min from the morning start having covered about 7.6mi.
Last updated 11/11/06.
Christopher E. Brennen